Tuesday, October 28, 2008

Bad Night at Levee Rock

Look's like I forgot about this GDS entry from a while ago. It came in fifth place of the "Going Solo: Man versus Wild" contest. I guess that's why.


(As with most GDS entries, this is just a rough 1st-pass game outline. So, even though it uses common parts, it has not been playtested, so please…be kind if you do play it.)


The storm of the century is causing the Rolenbohns River to rise, and the five levees that protect the small town of Levee Rock are about to burst. Using the manpower and equipment available to you, can you stop the levees from bursting, and destroying the town?

What you need:
  • (approximately) 20-30 Levee Dice (6 sided dice in one color)
  • The River (Standard playing card deck)
  • (just guessing) 12 Worker Dice (6 sided dice in a different color)
  • (maybe) 6 Light Equipment Dice (8 sided dice)
  • (possibly) 3 Heavy Equipment Dice (10 sided dice)
  • 1 Command Center Die (20 sided die)

What's going on here:
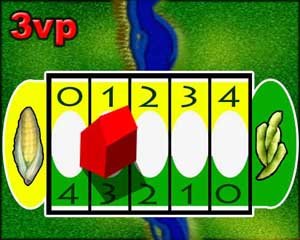
The cards will set water level of the Rolenbohns River at each of the five
protective levees that surround Levee Rock. Levee Dice are rolled, and as the River rises, Levee Dice are removed. If any levee loses all of its
Levee Dice, the levee breaks, the town is flooded, and the townspeople hang you to dry. And, oh yeah, the game is over.

If you can play through the entire deck of cards, the levees have survived the storm, and the town hails you as a hero.

Setup:
Define 5 areas on your table to be Levee Areas, Place 3 Levee Dice at each area.
Shuffle the deck of cards.
Keep your Workers, Equipment, and Command Center near you for the time being (otherwise known as the Command Center).


A turn consists of 5 phases, that occur in the order below:
DIRECT EQUIPMENT AND WORKERS:
You can move Worker and Equipment dice from your Command Center, and between Levee Areas. However, the larger the Equipment, the more time it will take to move.

When moving Equipment, roll the Equipment dice you wish to move, and place it BELOW the River cards in the Levee Area you wish to move them to. These dice are considered to be IN TRANSIT to the desired location. The number rolled indicates how much time it will take to get to the desired location and become ACTIVE.

You may move In Transit Equipment to a new desired location if you wish, but you can only redirent each Equipment once per turn.

Workers move fast, and are never IN TRANSIT. When moving Workers, simply place them above the cards in the Levee Area you wish to move them to. All dice above the River cards are considered to be ACTIVE in repairing and building up the levees.

EQUIPMENT MOVES:
Decrement all Equipment die faces that are In Transit. Once an Equipment Die has been decremented to show a 1, that piece of Equipment has made it to its location; move the die above the River cards to indicate that it is Active.

Roll the Command Center Die. The number rolled indicates the additional amount of “decrements” you can perform on any Equipment die. Again, any Equipment that is decremented down to 1 becomes Active.

REPAIR THE LEVEE:
Roll all Active (above the River cards) Worker and Equipment dice in each area. For every die rolled that is equal to or above 6, add a Levee Die to that Levee Area.

THE RIVER RISES:
In each Levee Area, you will be creating sets of two cards (and leftover
singletons). A set of cards is two cards that match in either rank or suit.

Once a set of cards is made, simply stack the two cards together, and flip them upside down in that area.

So…… for each Levee Area, draw a card; if it creates a set with another
singleton card, then stack the set together, and flip them face down.
Otherwise, leave it in the Levee Area as a singleton to be matched into a
set later.

If a levee draws a joker, remove a set from that levee. When the second joker is drawn, remove 2 sets from that levee.

LEVEE DAMAGE:
At each Levee Area, roll all Levee Dice. Remove any Levee Dice that is
equal or less than the current amount of card sets (not singleton cards) at that area. If all Levee Dice are removed from any one Levee Area, the Levee has been breached. The game is over. Levee Rock is destroyed. Stupid Mother Nature.

Labels: , ,

Friday, March 28, 2008

Captain Tempest and the Astro-Patrol: Final Episode

It's been a while since I've entered a GDS. In fact, I had no intention of joining up on this months edition, which is to create a compact game around an outer space theme. But then again, I really can't take ALL the credit for the design I submitted either...

Ultimately, the concept for the game started with my 4.5 year old daughter (of which you can see some of her fine artwork here). We finished a game of Gulo Gulo, and as she usually does after playing a game with the rules, her innate game design genes kick in. And the next game we are playing is of her design, pretty much making things up as we go, using the parts of the game we just finished.

In this case, her variant of Gulo Gulo involved random draws of the colored eggs from the mixing bag that is provided with the game. And after a few draws, it started feeling like something like this could turn into a GDS entry.

The planet card aspect of Captain Tempest wound up coming from the October 2003 copy of Games magazine, that I had recently found. Inside was a 1-page game called "Perfect Union," designed by Dave Shapiro. It's a simple area control game with the theme of an early 12-colony election, where each state was valued at different "electoral college" points. While not much of the actual Perfect Union game was used, the image of the various states and their point totals stuck with me, and became the other main focal point of the game mechanics. The "board" is shown off to the left here, in all of it's scanned in goodness.

At this point, the game was fairly themeless; simply drawing colored wood cubes to stake an ownership on a planet. But, this is a GDS entry, and I've found that theme often plays a much more important role in these contests. With not much else to go on than 800 sparsely written words, abstract games never fair well; the theme is often the hook that the people voting can most easily grasp, and will often overlook better games with lesser themes, if only because the theme lets them visualize things with a bit more clarity.

So, it wasn't much of a stretch turn the cubes into asteroids, and from there, creating a reason to be hurling asteroids at planets.

The last piece of the puzzle is probably the name. I decided that coming up with a name that evoked some recollection of old science fiction serials would be the best, as opposed to just a simple declaration of who the players represent. When viewed through the sepia colored memories of old black and white Buck Rogers movies, this creates an even stronger imprint of a look and a goofy breezy fun, and slightly goofy, feel of that style. The name of Captain Tempest really came from searching for a name that could somewhat match those of Flash Gordon or Buck Rodgers, and Nick Fury popped up, as another pulpy hero name; 1 syllable first name, 2 syllable last name and all.

From there, it was another small leap trying to find a word that had the same imprint as Fury; hence Tempest. Astro-Patrol simply completes the retro feel. And yes, much like Flash Gordon, the name is kind of jokey.

Of course, this desire to go towards 1930's serials probably wasn't hurt by the fact that I had seen Sky Captain and the World of Tomorrow recently.

(A quick aside here: In my previous work life, I worked with a fellow named George Gomez who was as big of a an as I am of old Bond movies. His most favorite Bond quote was from Thunderball, I believe: "Turn on the underwater landing lights." Sky Captain has such a delightful phrase, Angeline Jolie is the leader of the an airborne patrol who's base is a giant flying contraption that hovers around over the ocean. During an attack, she commands: "Alert the Amphibious Squadron." Just typing that makes me all giggly inside. I'm not sure if it's because of the brilliance of the line, or just the memories being brought back of George commanding that the underwater landing lights be turned on in his best Bond villain accent.)

But why is it the last episode? Well, since Captain Tempest and his band of do-gooders never arrive "during the game" to save the solar system, he has clearly lost. And the fact that he's isn't even a part of the game is part of the joke.


Captain Tempest and the Astro-Patrol: Final Episode

Due to the constant interference of Art Deco space-hero Captain Roger Tempest and his Astro-Patrol, the Council of Galactic Evil has decided that it's just better off to destroy the entire Earthen solar system than take it over. They do this by launching numerous asteroid attacks to destroy each planet. Good-bye Captain Tempest!!!

Of course, as always with the Council, every villainous deed becomes just another excuse to argue over who is the most villainous.


What you need:
  • Cloth Bag of many small same-sized plastic molded Asteroids, in 9 colors (1 color for each Planet). The Asteroids are roughly the size of small wooden cubes.
  • Nine Planet cards (color-matched to the Asteroids).
Each Planet card has the name of the planet, plus a value, as shown below:
  • Mercury - 1
  • Venus - 1
  • Earth - 4
  • Mars - 2
  • Jupiter - 4
  • Saturn - 3
  • Uranus - 2
  • Neptune - 2
  • Pluto - 1

How to play:
Players are members of the Council of Galatic Eeeevil.

The bag of Asteroids is mixed, and the 9 Planet cards are laid out available close to all players “to be targeted for an Asteroid attack.”

Player start the game by drawing 6 random Asteroids from the bag into one hand. This hand is where they will keep their stock of Asteroids, which must be kept secret from others.

After selecting at random who goes first, players take turns doing one of the following:
  • Draw 2 Asteroids at random from the bag.
  • Return X Asteroids from their hand into the bag(showing the discards to their opponents), and drawing X replacement Asteroids into their hand.
  • Draw 1 Asteroid and declare a Planet Attack.

When a player declares a Planet Attack, he announces a Planet name from the un-collected Planets that remain "to be attacked."

Each player now selects Asteroids from his stock, and places the selected Asteroids in his other hand.

All players reveal their selected Asteroids.

Whoever reveals the most Asteroids that match the color of the announced Planet is the player who gets to carry out the nefarious attack with a large, chew-the-scenery evil laugh, and is considered to be the winner (of this attack).

If there is a tie among any amount of players for the winner, then the player who declared the attack is considered the winner, regardless o how many matching Asteroids he had selected.

The winner returns all matching color Asteroids in his selection hand to the bag. He must also return an amount of Asteroids to the bag that is equal to the value shown on the Planet card that was attacked. These Asteroids come from his stock, and can be any color. If the player does not have enough Asteroids to cover this cost, he discards as many as he can; regardless, he still wins the card.

Players who did not win keep their "bid" and return their Asteroids to their stock.

Play continues as normal.

Once there is one Planet card left, the last Planet Attack is to be declared immediately by the next player (in other words, the last two Attacks will occur right after each other).

The game is over... When all Planet cards have been collected, the solar system has been destroyed!!! The game is over. Players reveal their remaining stock. All Asteroids in a player's stock of each color that are singles are kept; matching color sets of Asteroids are discarded.

A player's score total by adding all of the Planet values shown on their collected cards, and then subtracting the amount of Asteroids they still have in their hand (after colored sets are discarded, as noted above).

The highest score wins, and is deemed to be the most evil member of the Council.

Labels: , , , ,

Wednesday, January 16, 2008

Mouse Tar Tar

I guess I should update this. I find my self frequently the Game Design Showdowns less frequently on BGDF than in the past. Mostly this is a combination of:
A) I've won numerous times, therefore my desire to win has been lessened.
B) I've got enough of my own projects to work on.
C) The general bugginess of the BGDF has been experiencing with some upgrades occuring with it's ISP has been rather limiting my time there.

Anyway, my last attempt was back in October, with a rather bad finish of 6th place. Part of this I attribute to the fact that I completely missed one of the requirements: Set Collection, I believe.

There is usually the common complaint during these things about 800 words not being enough; this entry continued my downward spiral of trying to create something with less and less words, targeting more simpler party games with an interesting easy-to-grasp gimmick than trying to shoehorn an overly done gamer's experience. Plus, a continued avoidance of graphics, when possible, just to make it a bit more challenging.

Hence, the wackiness of building food platters with play-doh while trying to hide little plastic rodents within the food.

All of the gory details about the contest can be found here at the October 2007 GDS challenge link, otherwise known as "Eating Crow."

Chocolate Mouse
Each player gets 1 player screen, and 10 Bucks. Bucks are single coins or chits.

Additionally, each player gets two small, plastic dishes to create food items on.

One player gets the Food Critic badge. This is passed to the player on the left at the end of each round. Any player who is not the Critic becomes a Chef for that round.

Place on the table in the center where everyone can reach:
  • Containers of various colors of play-doh.
  • A pile of tiny plastic Grey Mice.
  • The deck of Entrees and the deck of Sidedishes, both face-down.
  • A 6 sided die, known as the Health Inspector.
A Round of Play:
If a Chef has at least one Rat, he must roll the die. If the Chef has more Rats than the die roll, he discards 2 Rats, gives half of his Bucks to the Critic, and must sit out this round.

The Critic draws 4 Entrees and 2 Sidedishes. He selects one of each, and discards the rest.

The Critic places his selected dishes face up on the center of the table. The Chefs will need to make these dishes to the best of their abilities and using the play-doh.

The cards are simple text descriptions of basic menu items: "T-Bone SteaK" and "Garden Salad".

The Critic should close his eyes, or leave the room, for the next phase of the game.

All Chefs secretly select an amount of Bucks and place that amount into the fist. All Chefs reveal their selected amounts.

For each Buck selected, each Chef can take play-doh of a different color. SO if a Chef selected 3 Bucks, he can take play-doh of three different colors. There should be enough play-doh for everyone; one player cannot "capture" a color from any other player.

However, the player (or players) who has selected the most Bucks must also take an amount of Rats equal to the amount of Bucks they selected minus the amount of Bucks that the next highest player has played.

Example: Steven and Joy both played 4 Bucks. Fred played 2 Bucks. Steven and Joy get to select 4 colors of play-doh, but they also have to take 2 Rats. Fred takes two color of play-doh.

Behind the screens, each Chef must now use their play-doh to construct the best looking Entree and Sidedish. If a Chef has one or more Rats, a Chef may try and hide the Rats in his dishes. Players are not allowed to mix colors of playdoh.

When all Chefs are done, they present their finished dishes by placing them randomly at the center of the table.

The Critic returns to the table (or opens his eyes), and takes 10 Bucks from the stock. He can touch the dishes, but can examine them closely. He votes on the most tasty looking dishes by placing up to 5 Bucks next to any dishes he wish. Otherwise he may divide up the Bucks any way he wishes.

Finally, the Critic may complain that any dish has Rats in it. If the accusation is true (by physically taking apart the play-doh in the dish), the Critic collects the Bucks next to the dish. If the Critic is wrong, the Critic must match the Bucks next to the suspect dish with Bucks from his own account.

The Chefs reveal who created what dish, and collect the Bucks next to their dishes.

The dishes are collected, and the play-doh is seperated back into the correct colors (as much as possible) for the next round.

For the Win:
After all players have had a chance to be a Critic three times, the game ends. A player's score is the amount of Bucks they have minus 2 bucks per Rat. Whoever has the highest score wins.

Labels: ,

Friday, May 25, 2007

The Great Canoe Race Challenge

In a rather surprising finish, I managed to snag 1st place in the May 2007 GDS at BGDF. I pretty much left this game for the dead, and even considered not spending the time to vote, due to the way that people typically vote.

It all starts at the beginning....

Last Thursday, when the contest theme and requirements were announced, there really was no genre announced, it was simply "create a canoe race" with some limitation regarding the thematic application of the race itself: simulate a long distance race, use canoes, and have obstacles to overcome.

And so, I quickly went about coming up with a game. But of course, as with all Game Design Showdowns, everyone is allowed one snarky comment about the just-posted conditions. (Well, if snarky comment rule isn't in the rules, it should be!).

And my comment was: "Is this supposed to be a game based on a canoe race, or for an ACTUAL canoe race?"

And I gleefully walked away, tuning up my entry. Which was then submitted.

This started a series of emails back a forth between Byrk (the guy who runs the GDS) and myself regarding my game; with him making suggestions about reducing it to tabletop form and such.

Normally, he doesn't make suggestions on these things. He just collects the entries, fixes some formatting, posts 'em, and collects the votes. Which all sounds really simply, but from my experience guest hosting, is a lot more work than one would think.

Anyway, a later post revealed what had happened. Due to my snarkiness, he added the "card or board game" restriction. And my design is a lawn bowling/dexterity/croquet variant. And therefore, was was disqualified for not meeting the requirements.

Not having enough time to come up with something new, and still really liking the idea of the lawn game, I suggested that he just put a disclaimer on the entry. At one point, it did qualify after all. Well, before my smart mouth. And so it was resolved, at least on that end.

However, asI said, I figured the game was a dead issue at this point. Typically, the way I THOUGHT people voted is that noone bothers to even read entries that don't meet the requirements; such as those entries which go over the 800 word limit. So I figured that everyone would go "Hey, it's not a board game, I won't bother with it."

Not that I think this is a wrong way to do things. You have to narrow out your best games somehow when voting and it's a good way to start, so you can spend your time where it's needed; trying to parse through the 4, 5 or 6 games that you think are special and deserve votes.

Alas, I was proven wrong.

As a historical side note, the story of Major John Wesley Powell is pretty interesting, if only due to the fact that not only was he in command of the first group of Europeans to raft down the Grand Canyon, but he did it with ONLY ONE ARM which he lost in the Civil War. That's pretty hardcore.


Major John Wesley Powell's Lawn Rafters

After being the first to river raft through the Grand Canyon, Major Powell takes on his next great adventure--your backyard!

A Lawn Rafter Kit Includes
  • 4 flags to designate Campsites.
  • Each player gets 3 Explorers. Each Explorer has a clickable Health Ring. Also, when tipped upside down, there is a Magic 8 ball-like die hidden in the base (explained later).
  • Each player gets 8 Supply blocks.
  • Each player get one Canoe. Canoes are little larger than the size of an American football,they have large wheels, and there is a recess at the top for placing Explorers and Supplies.


SETUP:
Place the Campsite Flags throughout your yard, preferably faraway from each other. These are effectively race checkpoints.

Each player loads up his Canoe with Explorers (up to 3) and Supplies (up to 8). It should be noted that the recess of the Canoe cannot hold all 9 items; there is limited space, and it is up to the player to determine how much of what he wishes "to pack" and how to pack it effectively. Explorer's Health Rings should be set to 2.

GAMEPLAY:
On a player's turn a player may do one of the following:

MOVE:
A player can pick up their Canoe (filled with Supplies and Explorers) and roll it (like a bocce ball or a bowling ball) across the yard, trying to hit the Campsite Flags in order. Players must be careful when rolling their Canoes, as hitting large bumps may cause Suppies and/or Explorers to fly out of the Canoe, rendering them Lost.

Any Lost Explorers should have their Health Ring clicked down 1 spot. If a Health Ring points to X, the player flips over Explorer, and looks at the "Magic 8 Ball" window, which randomly determines if the Explorer has "NO INJURY," or "BROKEN LEG." An Explorer with a Broken Leg is removed from the game.

If a Canoe hits an Abandoned (explained later) Supply or Explorer, the player may Rescue it by picking it up and placing it in their Canoe if they wish. Non-Abandoned? (Lost) Supplies and Explorers can only be Rescued by their owner.

Lost and Abandoned Explorers that are hit by Canoes should have their Health Rings clicked down minus 1. And again, if a Health Ring is at X, check for a Broken Leg to remove the Explorer from the game.

RESCUE:
However, if a player does not wish to move his Canoe, he can simply pass up a move to simply pick up one lost Supply AND one lost Explorer and put it back in the Canoe, without moving the Canoe. However, if a player decides to move and leave Explorers and Supplies that have recently been lost, then those are considered to be Abandoned, and can be Rescued by any player with a carefully aimed move.

The player Abandons Explorers and Supplies to "the River" by moving his Canoe. Abandoned Explorers and Supplies are left in the yard where they were lost.

CAMPSITES:
After hitting Campsites 1,2, or 3 a player can HEAL or EAT:

HEAL:
A player remove Supplies from his Canoe to add points to his Explorer Health Rings. For each Supply removed, he can "notch up" 1 Health.

EAT:
Whether or not a player Heals, one Supply MUST be removed from the Canoe to feed the Explorers. If there are no Supplies left, the player must remove one of his Explorers from the game (mmmm, cannibalism).


WINNING:
Once a player hits the fourth and final Campsite, each player has one more turn to make the final Campsite. If noone else hits the fourth campsite, the player is the winner.

If other players hit the fourth Campsite, then the winner is determined by:
  1. First, who has the most Explorers in their Canoe.
  2. Second, who has the most Supplies in their Canoe.
Out of the Game
If at any point, a player has no Explorers left, he is out of the game.

Labels: , , ,

Friday, March 16, 2007

June 2005 - Doppleganger

Since BGDF has moved over to a new server, they will eventually lose all of their old posting. So now I have to keep a record of my showdown entries somewhere else.

With this game, I have finally archived all of my GDS entries. WHEW!

This was my first attempt at an entry. While everyone thought it was an excellent concept, it wound up in fifth place due to the fact that it didn't meet the "pick up and drop off" requirements (something that I completely forgot about when working on it). My updated version of the game has this element NOW; of course, the rules are a bit longer than 800 words, too. I'm still not sure how viable the game is in it's current form; at some point in the distant future, I may even be able to play it.

I've learned quite a few tricks since this first attempt at creating "award winning" GDS entries. Namely:
1) Keep it simple. First of all, you have only 800 words. That's not a lot. Secondly, people don't vote for games that they can't understand.
2) Really, REALLY, make sure you have met all of the requirements. In general, people don't have the time to go over all the entries with a fine-toothed comb. And so, people are looking for any simple way to pare down the list quickly. And at first glance, if the game doesn't meet the requirements, it gets chopped off the possible vote-getters quickly.
3) Along with number 2 above, never, EVER go above 800 words. Unless you want your game passed by like a hitchhiker on the side of the road with a severed head in his hand.


Dopplegangler: Unleashed From Groom Lake!
OBJECT: Investigating the abandoned Groom Lake test site, the players have found conclusive evidence of past Alien experiments. However, their vehicles have been sabotaged. Now, the team is trying to cross the desert to civilization with their proof, but one team member has been taken over by an Alien, trying to foil their plans.

COMPONENTS:
CHARACTER CARDS and WIN CONDITIONS:
Each player gets one hidden character card.

One player will be randomly assigned the ALIEN card. If all HUMANS and the BOUNTY HUNTER die before reaching civilization, the ALIEN wins, regardless if he is still alive.

One player is an ALIEN BOUNTY HUNTER. The BOUNTY HUNTER wins solely if he kills the ALIEN.

The rest of the players are HUMANS. HUMANS who are still living who make it to a Civilization tile win the game.

DESERT TILES:
There is one tile designated as GROOM LAKE (the start tile). Tiles are drawn and placed to form a map of the Desert. Also, some tiles have Events on them which must be followed.

THE GROUP:
The Group pawn starts on the Groom Lake tile. The rest of the tiles are divided into three piles, shuffled, and placed face down. The three piles are determined by icons on the back of the tiles: 3,6, and compass.

SUPPLY CARDS:
Each player draws 12 Supply cards, and discard 6 at the start of the game. ALL SUPPLY CARDS CANNOT BE SHOWN TO ANY OTHER PLAYER UNTIL THEY ARE PLAYED DURING THE GAME.

HAZARD CHITS:
HAZARD chits are played on marked Desert Tiles as they are revealed. The Group cannot move onto a Desert Tile unless the Hazard on the tile is removed by the group discarding the appropriate Supply Cards, or possibly by discarding a life token.

LIFE TOKENS:
Each player starts with 5 Life tokens. Player with no life tokens have died.

A PLAYERS TURN:
A player has two Desert actions:
--Scout the area.
--Move the group to a neighboring Desert Tile.

SCOUT THE AREA:
The player picks up two Desert Tiles. HE CANNOT SHOW THESE TILES TO ANYONE ELSE. He chooses one, and discards the other. If the group is 3 or less tiles away from Groom Lake, he takes tiles from the “3” pile of tiles. If the group is 6,5, or 4 tiles away from Groom Lake, he takes tiles from the “6” pile. otherwise, he takes the tiles from the “Compass” pile.

If the tile shows a prt of the desert, he must place it next to the tile that the group is currently on, the graphic edge elements must match (ie, the paths must continue across both tiles). If the tile cannont be placed next to the current tile the group is on, the player loses a life token and places the tile anywhere on the board. Again, the graphic elements along the edges must match.

If the tile indicates that it has a Hazard, the player draws two Hazard chits, selects one, and places it face down on the tile, discarding the other one. PLAYERS CANNOT SHOW TO THE OTHER PLAYERS OR DISCUSS FACE DOWN OR DISCARDED HAZARD CHITS until they are flipped over during play.

If the tile is an Event tile, the players must follow the directions of the Event.

Event tiles can let player find supplies, swap character cards, or result in life token/supply loss.

MOVE THE GROUP:
M the pawn to the next tile as long as it follows a path.

Moving to a town (civilization) tile wins the game for all remaining Humans.

If the tile has a Hazard chit on it, it is flipped over, and the players must play Supply cards and/or Life tokens to remove the Hazard. If the Hazard is not removed, the Group token is moved back to the previous tile.

Some Hazards require cooperative card play from the entire group; other Hazards require play from each player individually.

ALIEN ACCUSATION:
After any player’s turn, any player may accuse another player of being the Alien. Then a vote is taken to determine if the accused player should be killed (removed from the game). If a simple majority vote a player to be an Alien, then that player is removed from the game. DO NOT LOOK AT HIS CHARACTER CARD.

Instead of taking a vote, the Alien Bounty Hunter may reveal his character card, and independently kill another player. That player’s character card is flipped over. If the Bounty Hunter selected the Alien player, the game is over, and the Bounty Hunter wins. If the player is a Human, the Bounty Hunter and his target are removed from the game.

When a player is removed, his supply cards are dealt randomly to the remaining players.


Labels: ,

Wednesday, February 28, 2007

July 2005 - Under the Cupboard

Since BGDF has moved over to a new server, they will eventually lose all of their old posting. So now I have to keep a record of my showdown entries somewhere else.

This showdown was pretty tricky, coming up with a game that had a gaggle of random pieces AND still keep it under 800 words proved that clever use of those words is just as important as what the words were saying.

Since it's easier to copy-n-paste from the archive than to link to it itself, here's the list:

Component List
155 Wooden cubes (31 each of five different colors)
50 tiny Wooden disks (in one single color, Brown)
36 plain double-sided square cardboard Tiles (blue on one side, red on the other)
30 cardboard Shield tokens (in one single color, Blue, with 10 each of three types, labeled 1, 2 and 3)
16 Wooden disks (in one single color, Yellow, numbered 1 to 16)
15 plastic Pawns (3 each of five colors)
10 six-sided Dice (2 each of five colours)
10 Wooden Elephants (in one single color, Brown)
5 Wooden markers (in the shape of a chair, an onion dome, a head, a plain square and a dragon)
Cash (in 1,5,10 and 50 denominations)

Mechanics Limitation:
Auction: There should be an auction that occurs more than once during the game.


Something I learned from this is that GDS entries don't need to waste their words on expressing a component list; you can simply intoduce the components as you go.

Typically, usual GDS entries are fairly "heavy" in regards their theme. For this month's entry, I decided to try and go against that grain, and instead try for something more whimsical, as if it was a game based on a children's book. In fact, at one point, I was calling it Whimsy. But then, I hit the 800 word limit, and included the first 3 words of the game theme description as the title of the game.

I still like the way this game reads. Maybe one day I'll collect the large component list to try it out.

Anyway, here's the entry.

Under the Cupboard...

…there’s a small mousehole that leads to a wonderful world. A world of delicious nectars and talking elephants, where every object is sprinkled with magic; if only you could convince Nimskill, the Guardian Mouse to let you visit. It has been rumored he likes honey…

Each player gets:
Equal amounts of CASH.
Three PLAYER PAWNS in their color.
Two DICE in their color.

All SHIELD TOKENS are placed facedown, center of table.

The game has four rounds. Each round has three phases:
--AUCTION
--UNDER THE CUPBOARD
--ENTER THE MOUSEHOLE

--AUCTION:
The last player to enter the mousehole, divides up all discarded Honey (YELLOW DISCS) into an amount of stacks equal to the amount of players, any way he wishes. At game start, a random player does this with all the Honey.

Players openly bid using their cash for each stack. Each player can only win one stack per round. All cash paid is removed from the game.

UNDER THE CUPBOARD:
Place Nimskill’s Will Power (50 TINY DISCS) in the center of the table.
During a Cupboard Set, players secretly selects one of their Honey discs and reveal their Honey value simultaneously. Players take turns removing Will Power equal to an amount of Honey followed by flipping over Shield Tokens to remove Will Power. The turn order is based on the Honey value, lowest (goes first) to highest. If any Will Power remains, the next lowest player goes.

The first player may select to flip 0 to 4 Shield Tokens. After that, a player can only select to flip up to one less than the previous player.

(Player one flips 3 Shields, the next player can flip over up to 2. If the second player chooses to flip over 1 or none, no others players can flip shield tokens this set).

If all players have played their Honey, and NimSkill still has Will Power left, the set starts over again, with players secretly selecting new Honey. The lowest Honey Player again can choose up to four shields.
If Nimskill’s Will Power is reduced to zero, the Cupboard Phase ends, and the player who removed the final Will Power gets to ENTER THE MOUSEHOLE. This player is called the GUEST. Other players are called HOPEFUL.

ENTER THE MOUSEHOLE:
--Build a 6X6 grid using the BLUE/RED TILES, all tiles start RED.
--Starting with the Guest, players take turns flipping any tile to BLUE until 18 are BLUE.
--The Guest randomly places one Nectar (COLORED CUBES) on each tile.
--The Guest place his Pawns on the tiles. Followed by the Hopefuls doing the same. One Pawn per tile.
--The Hopefuls place the ELEPHANTS on tiles without Pawns. (3 elephants on the first three rounds, all un-owned elephants on the last).
--The Guest removes two of his pawns from the tiles. He will be moving the remaining Pawn.

The Guest moves by:
Rolling his dice, and selecting one of them.

The Guest MUST move the amount of tiles, in any NSEW direction as indicated by the selected die. The Guest may “wrap around” the board.

The Guest can ONLY move to a tile that has a Nectar on it and is the opposite color of the tile the Guest is currently on. Unless the Guest rolls 2 sixes; then he may jump to any tile.

When a Guest lands on a tile with a Hopeful Pawn, the pawn is returned to it’s owner. The Hopeful Owner also gets ownership of the Magic Item (WOODEN MARKERS) related to the color of the Nectar on that tile. (ex:red-dragon, yellow-onion, brown-head, blue-square, green-chair). Magic Items can move from player to player this way.

When a Guest lands on a tile with a Nectar, he keeps it in his temporary Stash.

When a Guest lands on a tile with an Elephant, he keeps it in his temporary Stash, and may leave the Mousehole. Leaving the Mousehole let’s the player keep all items in his temporary Stash. If the Guest does not wish to leave, he rolls the dice again.

If the Guest cannot move to a opposite color tile with Nectar on it, the Guest is expelled from the Mousehole! Everything that was collected in his temporary Stash is returned “to the bank.” Collected “stuff” from previous Mousehole visits and Magic Items are not returned.

If a player leaves or is expelled from the Mousehole, a new round of the game begins with the Auction setup. The game ends after the fourth visit to the Mousehole.

GAME OVER:
Points are awarded for:
Nectars collected, double points for Nectar that matches the player’s color.
Elephants collected.
Value of leftover Honey.
Ownership of Magic Items. Bonuses for Magic Item combos (chair + dragon = the Dragon King)

Labels: ,

Tuesday, January 30, 2007

September 2005 - Stackanimals

Since BGDF has moved over to a new server, they will eventually lose all of their old posting. So now I have to keep a record of my showdown entries somewhere else.


Components:
A small inflatable pool filled with colored inflatable animals (say, 10 different types of animals) where each animal is roughly about 6 or 7 inches in size. A bag with small miniature animals that matches the inflatable animal shapes.

Object:
To create the tallest stack of inflatable animals without it tipping over. A stack consists of a single stack of animals, one on top of the other.

How to Play:
Each player has a defined “play area” to build their stack which are all roughly the same distance away from the central pool of animals. One player reaches into the bag and pulls out two random animals. All other players then race to the pool, and find one of each of the drawn animals. Taking the animals back to their area, they must stack the inflatable animals building on their stack from previous turns.

Any player who’s stack falls over must place all of their animals back into the pool and is out of the game.

The player who finished stacking their new animals first is given the bag to randomly select the animals for the next round. When it is down to two players, they take turns drawing the animals from the bag, and building their stacks.

The last player to have their stack tip over is the winner.

Labels: ,

August 2005 - The Great Sardini is Dead

Since BGDF has moved over to a new server, they will eventually lose all of their old posting. So now I have to keep a record of my showdown entries somewhere else.

A lightly themed abstract card game for any reasonable amount of players)

Magician Wanted: Exclusive Copa Club has an opening for prominent headlining magic act for the World Famous Copa Club floor show. Tryouts to commence this Monday. Competition expected to be fierce, so any trick that is is failed to be performed correctly will result in immediate dismissal.


Object: Play cards from your hand to perform the magic MOVES required to complete a magic TRICK. All cards played to complete a Trick are collected. Player with the most collected cards wins.

The Cards: Each card has two different components. When played out of a player’s hand, the suit and rank of the card as indicated in the corner is used. Ranks are 1-10, and the suits are Wands/Top Hats/Stars/Smoke. When played as a Trick to be completed, the center area is used, which shows the Trick Name, and up to four Moves which need to be completed to collect the Trick.


Setup: Shuffle the cards and place the deck face down. Reveal the first set of Tricks by flipping over the top cards from the deck and placing them where all players can see. The amount of Tricks revealed will be 1 less than the amount of players playing. (The players may decide before the start of the game to have more or less Tricks available depending on how much space they have.)
The first player is decided randomly, and turns progress to the player's left.

On a player's turn, he may do one of the following two actions:

1) Attempt A Trick. The player announces he wishes to try to win a Trick. He announces which Trick he is trying to complete/collect. The player then starts to play cards out of his hand to complete each Move listed on the selected Trick, in any order. Example Moves: “any 3 wands”, “2 cards that add up to 11”, or “1 or more cards with a rank less than 3”. After completing a Move, the player can draw one extra card to his hand before performing another Move. (A player can attempt a Trick without having all the cards he needs at the start, in the hopes that he can pick up the cards he needs to finish other Moves.)

If the player fails to perform all the Moves on a Trick, the player is removed from the game.

If the player completes all of the Moves on the Trick, the player takes all of those cards played, plus the Trick card and places them in his completion pile. He then announces if his “Act Is Over” or if he’s “Going For An Encore”. In either case, the player flips up the top card of the deck to reveal a new Trick. If his “Act Is Over” the next player can draw one card, or attempt the new Trick. If the current player is “Going For An Encore,” the player MUST attempt this new Trick.

OR

2) Draw Cards. If a player does not wish to attempt a Trick, the player can draw cards into his hand. If the previous player Attempted a Trick, the current player draws one card. Otherwise, the current player draws the amount of cards the previous player drew plus one more card. (So, the first player would draw 1 card, the second player draws 2 cards, the next player draws 3 cards, etc, until someone decides to Attempt a Trick, at which point, the "counter is reset" to 1).

All cards drawn are hidden from the other players. There is no limit to how may cards a player may hold.

The game ends when only one player is left due to the other player's being eliminated from failed tricks, or when the draw deck is exhausted.

Labels: ,

Thursday, January 25, 2007

1st Place for January

In a close call this time, my concept for this month's BGDF design contest wins 1st place. Kind of surprising, really, based on just the cool concept of the second place game (which I gave as my first place game of 4 points).

Don't have too much time for discussion; I've got to take a nap while I still recover from the "Cold Virus of Death" that has been lingering over me for over a week.

Continuum: The League of Temporal Scoundrels, Pirates, and Thieves

It has been said that throughout the history of invention, a precious few items were created with material so unique, so special, dare I say Magical, that when collected together, it would endow the owner with great power and abilities. These items are linked together by forces which we cannot comprehend even in the Year 3000.

But alas, these items have been scattered throughout the world, lost throughout time.

Well, until the Year 3000 when the Time Machine was perfected.

Now, the League is tracking down these valuable items, using their gifts and abilities, to gather the largest collection of these Antiques. Breaking the time/space continuum, be damned.


SETUP:
Build the Time Nexus Map using the 70+ YEAR TILES. Tiles are blank or have Years (ie: 1582) on them. Player start on Year 3000. The map is preferred to be built haphazardly, creating something like a finished Carcassonne layout.

After shuffling, place the top five cards from the ANTIQUES DECK face up on the table. Anytime a player collects a card from the table, a new Antique is drawn to replace it.

An ANTIQUE CARD has the following on it: Name, Creation Year, Order Created number, and occasionally additional rules. An Antiques on the table (not owned by a player) exists on Earth in any Year beyond, and in addition to, it's Creation Year date. The Order Created number indicates the order in which the Antiques were created (the oldest Antique is 1, the second oldest is 2, etc.).

MOVING:
On a Player’s turn, a player VISITS A YEAR by deciding if he is traveling into the “Past” or “Future”. When moving into the Past, the player must move to a neighboring Year tile that is a prior Year than the Year he is moving from (1920 to 1834 to 1712); moving into the Future, the next Year tile must be after than the Year he is moving from (1251, 1954, to 2010).

The number of tiles a player can move is based on his greatest LINK of Antiques he owns. A Link is a numerical run of Antiques that are in exact numerical order based on their Creation Order number.

Example: A player has Antiques 11, 21, 22, 23, 56, 57, 86, 96. This player has a 3 card link (21, 22, 23), so he can move a maximum of 3 Tiles.


STEALING:
After moving, a player may STEAL one Antique.

When stealing from the table, the Antique’s Creation Year must be earlier or equal to the current Year the player is visiting. The player takes that card, and places a YEAR TOKEN on it that matches the Year he is visiting. This represents the Year in which he has stolen the Antique for his collection. All owned Antiques (with Year Tokens) are displayed in front of their owners.

To Steal from another player, the active player must be Visiting an earlier Year than the Year Token on the target Antique owned by his opponent. The active player takes the Antique from his opponent, and places a new Year Token on it based on the Year the active player is currently visiting. (The active player has stolen the Antique earlier in Time than his opponent; since it didn’t exist in the time when the opponent stole it, he can’t own it anymore. Got it? It’s crazy movie time travel stuff!!).However, a player can’t steal an Antique if he is in a Year that is prior to it’s Creation Year (since it wasn’t created yet).

Stealing an Antique in the same year as it’s Creation Year makes it “safe,” and cannot be stolen further. But since the Time Nexus board is big, and hard to travel across, this will be hard to do (in theory).


SPECIAL RULES FOR CARDS:
Certain Antiques (or combinations) will have special powers. Some powers will need an additional die roll to see if the player has broken that Antique while activating the power, causing the Antique to be discarded from the game.

Examples:
Mark Twain’s Pocketwatch plus Otto von Bismarck’s Cuckoo Clock: Player can change their past/future movement setting once during their move.

Davinci’s Flying Machine, Excalibur , plus Liberty’s Torch: Player can travel through blank tiles.

Full of Stars Monolith:Wild with respect to it’s Creation Order, and can be used to complete a “link” where only one or two Antiques are missing.

Hindenburg:Player can move diagonally in the Time Nexus.


GAME ENDS:
When all Antiques have been placed on the table, one more round of player’s turns commences. After that, the player with the most Antiques wins the game.

Labels: ,

Thursday, December 21, 2006

Another 1st Place Finish!

Meatlockerz! wins first place. I'm kind of surprised, being that it's more of a kids game. But then, maybe not. Some of the game read pretty complicated, which is usually a killer, and I think the componentry of a lot of the other games killed them. Meatlockerz really has no pieces to lose or drop; just a bunch of plastic cards with dials.

Annoyingly, a few days after sending in my entry, I came across a game who's gimmick is frighteningly similar. Holes in cards, that when faced against another card, damage numbers appear in your holes. It's over on the Cheapass Games Webpage.

Anyway, here it is for my records, and posterity.

MEATLOCKERZ!

Fighting in the Secret Underground Meat Locker Fighting Club
For ages 6 and up


THINGS
Each player selects a Meat Locker Fighter. Each Fighter has a Hit Point window, and two Fist windows. Player can spin discs that are attached behind each window to keep track of Hit Points, and to select Punches. An additional Special Move window and may be available on some Fighters (see below).


GAME
The game is played in rounds. Each round, the players secretly select their Punches by spinning the discs for each Fist. When selecting a Punch, they are moving Punch Strength numbers, special Punch icons, cut out windows, and blank Blocks (white cardboard that isn't cut out and has no icons on it) in the Fist window. In general, the more powerful a Punch, or special icon is, the less Blocks there are surrounding it, and more cut out windows.

After selecting their Punches, both Fighters are placed face to face. Each player can now look at the back of their Fighter. The cut out windows from their Punch discs may reveal Punch Strength or special icons from their opponent (if they weren't Blocked, of course). These are punches that the opponent has landed!

Add up the numbers you can see, this is your damage total. Each player takes back their Fighters, and subtracts their damage from their Hit Points by spinning the Hit Point disc. And a new round starts with player selecting their Punches again.


TO WIN
The game is over when a Fighter goes below 1 Hit Point. He has been defeated!

SPECIAL MOVES
Fighters will have special icons to designate Special Moves. Rollo, the Fighter shown in the example illustrations, has a Blue XX icon on one fist. If this icon makes it through unblocked, then any damage scored by the other fist on the same round is multiplied by 3!

Other Boxers may have a fourth window and disc on the bottom to keep track of variable Special Moves.

For example:
Vinnie the Vamp, scores no Hit Points with his Punches. However, if Punches from both fists are unblocked, he can do a Drain Move, taking X Hit Points from his opponent, and adding X Hit Points to himself. The first time he does this, there is 1 Hit Point transferred, the second time, 2 Hit Points are transferred, etc. The Special Move disc keeps track of this.

Laos can unleash a Palm of Death (a high-damage Punch, if unblocked), but only if he has had a successful unblocked Punch in three prior successive Rounds. The Special Move disc can keep track of "hits in a row".

MISC:
I don't claim Rollo to be balanced. He's just an example.

In real life, there probably would be 5 or 6 visible spaces on the fists.

Balance between characters can be achieved not only by Punch Strengths, Blocked/Cut out windows, and Special Moves, but also by different Hit Point maximums (some powerful characters could have much lower Hit Point starts).

I'm sure someone would bring this up (even though it should outside the scope of the contest), I don't think this would be sold as a CCG (even though it could); my inclination would be themed sets of 8 Boxers a piece.

Labels: ,

Wednesday, December 20, 2006

October 2005 - Eras Academia

Since BGDF has moved over to a new server, they will eventually lose all of their old postings...possibly. So now I have to keep a record of my showdown entries somewhere else.

ERAS ACADEMIA

GOAL: The player with the best school at the end of the game wins.

Components and Information:
There are four studies: Green: Natural Science, Blue: Social Science, Red: Humanities, Yellow: Arts.

-- Each player has a School Map for building Campuses, and for Graduates. Map and Campuses can be licensed properties.


-- Graduate Counters in the four colors.

-- Fund counters.

-- Small marbles in the four colors.

-- One deck of Action cards for each color. Flavor text on cards can provide facts and trivia about the licensed school.


-- One cardboard Era Guide, which describes the amount of marbles placed in the Clock, with cutouts to hold marbles.


-An Era Pawn that indicates the current Era on the Era Guide. Pawn starts in Era 1.

-- Large plastic opaque Clock Tower with a door on top that can be used to load up to 40 marbles. When shaken, the marbles are secretly mixed up; when stood up on the table, the marbles randomly form a hidden straight line down the shaft of the clock. A button releases the bottom marble from the stack. Also, there are small doors in the shaft which a player can open and look at a color of a single marble. The Clock is filled with marbles as shown (8 green, 7 blue, 9 yellow, 6 red) in Era 1 on the Era Guide. The Clock is passed to the next player every round. All player actions start with the owner of the Clock. All ties are broken by who sits closest to the Clock.


-- A Pool of wood blocks for players to build buildings on Campuses. Blocks come in square "1-Story" and pyramid "Roof" shapes. 1-Story Blocks are always available. There are only 2 Roof Blocks available per Era.

All players start with a 1-Story Block on their Administration Campus, and 5 Funds. A random player starts with the Clock.


A PLAYER'S TURN in order:
1) Graduates his class.
A player gets one Graduate Counter for each 1-Story Block in a Study Campus (not the Admin Campus). The Graduates are of the same color of as the Study that the Block is in. (A player with two 1-Story Blocks and 1 Roof Block in the Art Campus will get 2 yellow Graduates). A player places his Graduates in his Graduate circles. He may place 1 in a circle, or place multiples of the same color in circles to create Superior Graduates.

2) Spends Funds on:
-- Building His Campus.
Buy any available Block with funds equal to the amount of Blocks on the Administration Campus and place it in a chosen Study Campus square, stacking upon any previously played 1-Story Block in that Campus.
A Study Campus cannot exceed the amount of Blocks that the Administration Campus has.
Once a Roof Block is placed on top of a building in a Campus, a player cannot build any more Blocks on that Campus.

-- Analyzing the Future. A player may spend 2 funds to look in any window on the Clock Tower or 4 Funds to look at a top card on any deck. The player should be careful not to reveal this information to the other players.

CLOCK ACTION:
After all players go, the button on the Clock is pressed to release the bottom marble. The marble is placed on the appropriate spot on the Era Guide. Draw the top card of the matching colored deck. This card indicates this year's "culture" of which Graduates are needed. Cards are generally happier towards their color (Yellow cards will generally need more Art graduates than others).

Some Cards can have Clock Effects.

Players take turns "hiring out" appropriate Graduates for Endowments (Funds), starting with the Most Superior Graduates (most counters) and working down to the least Superior (Graduates with 1 counter). In case of a tie, the order is determined starting with the player closest to the Clock.

All unused Graduates are removed.

ERA CHECK:
If an Era has four of one color marble that has been released from the Clock Tower, Advance the Era Token on the Era Guide. Empty out the Clock, and fill the Clock with the new marble distribution as shown on the Era Guide. Make sure there are two Roof Blocks on the Era Guide to start the new Era.

The clock moves to the next player.

GAME ENDS:
The game is over when 4 Eras have been played, or when all 1-Story Blocks have been bought out. A building's point value is determined by 1 point per 1-Story Block, and 5 points per Roof Block. A player's score is determined by taking the highest point scoring Study Campus building they have and multiplying that number by the lowest point scoring Study Campus Building.

Labels: ,

Tuesday, December 19, 2006

Travelin' Light!

So, I decided to enter this month's BGDF showdown, Travelin' Light #2 It's been a couple of months since I've entered, as my time has been taken up with PocketCiv (which now I'm convinced I need a new name for, as it has grown beyond my original pocket inclinations).

And since I'm in the showdown this month, I feel the requirement to vote. Once you get away from all the pretty pictures, I feel that most people completely missed the boat on the whole purpose of the contest, which is to design a game that's playable while sitting in the back seat of a car, or flying in a plane. Well, at least that's what I feel is the main goal.

Not wanting to tip my hat as to which is my entry, but there are quite a few entries with many components; pawns, a board, and cards. Passing a board back and forth between players without jostling the peices (yes, even if they are magnetic) is difficult, especially when you are holding a handful of cards which your opponent cannot see. Oh, and don't forget not to knock over the discard pile!

It seems like most people simply stuck in the rules a quip about their board being able to fold down into a small box, thereby meeting the small size requirement, and went off from there with whatever game they wanted to do. Sorry, I'm not letting you guys off this easy this time!!

I'll be interesting in the voting results. Well, aside from seeing if I won, but it will be interesting to see how many people took the "playable while traveling" into account during the voting process.

Labels:

Tuesday, November 07, 2006

November 2005 - Hero, Myth, Hail Toileticus!

Since BGDF has moved over to a new server, they will eventually lose all of their old posting. So now I have to keep a record of my showdown entries somewhere else.

Place plastic Items randomly on "Lands" (islands and coast areas) on the large map of the Mythic Greek coastline, islands, and reefs. Each player starts his ship on the village Olympus.

Each player starts with five Persuasion Chips, and gets 12 Collection Cards in the player's color and randomly discards four. Cards show Items that players must return to Olympus.

Give one player the Spyglass, which designates the Navigator. The Navigator asks each player in turn (who becomes the Captain) if he wishes to Follow a Course, or Plot a Course. After each player has been a Captain, pass the Spyglass to the left to start a new round.

The Captain may select a new crew by taking up to 6 Double-Dice ("Sailors") from the stock if he is docked at a Village. Otherwise, he sails with his current crew.

Plotting a Course: The Captain declares which Land he wants to sail to, starts with a dry-erase marker on Land near his ship, and puts on a blindfold. One of 6 sand timers based on the crew size (more Sailors equals the faster the timer goes, due to supply usage) is flipped, and the Navigator verbally instructs the blindfolded Captain in drawing his Course.

If the Course hits a Beach or Village before the timer runs out, the Course is finished, regardless if they have reached the desired destination. The Captain may dock his ship on this Land. Mark the starting and ending locations of the Course with the initials of both Captain and Navigator. If the desired destination is reached, the Navigator gains 3 Persuasion Chips.

If the Course hits a reef or a mountain side of a Land, or the timer runs out, both players get a Shipwreck Counter, the Captain discards all Sailors, and places the Items on back on Lands (always at the Captain's choosing). This course is erased.

(It is the best interest of the Navigator to help: he can use drawn Courses, gains Persuasion Chips, and avoids Shipwreck Counters.)

Follow a Course: A Captain moves his ship along any Course marked with his initials that is connected to a Land that his ship is at. After moving, erase this Course.

When at a Land, the Captain may collect the Item there. If the Item is a Monster, it has a Strength Number, and the Captain must Battle to collect it.

The Captain rolls the amount of Double-Dice shown as the Monster's Strength, then his Sailors. The Captain aligns one Strength to one Sailor. With uneven forces, the Captain removes excess dice after rolling at his choosing. Any "inner die" (DEFENSE) that is less than the "outer die" (ATTACK) of an opposing die, discards that Double-Die. Since damage is inflicted simultaneously, both dice can be discarded. If dice remain on both sides, they are rolled and arranged again by the Captain. If the Captain loses all his Sailors, he places the Items back on Lands and docks his ship at Olympus. If the Captain has remaining Sailors and the Monster has no Strength, he collects the Item.

If two ships are docked at a Land together, the Captains may trade Items, or the acting Captain may start a Battle. Each Captain rolls their Sailors, secretly align their Sailors in a row, and then are revealed, matching them in one-on-one battles, and "deaths" are resolved as above. The losing Captain moves his ship to Olympus, and hands over all his Items to the winning Captain. If both Captains lose all Sailors simultaneously, all Items are placed back on Lands, and both ships are placed at Olympus.


When docking at Olympus, a Captain delivers his Items to the Gods by placing the delivered Items back on Lands, and placing matching Collection Cards on the leftmost (highest-scoring) open spot in the appropriate row of the Scoring Board.


After delivery, a Captain can try to persuade the Gods to swap any one of his Cards with another Card directly to it's left on the Board. The players of both Cards secretly place any number of their Persuasion Chips in their hands and reveal simultaneously. If the acting player reveals more, the Collection Cards are swapped. The Persuasion Chips that were used are swapped between players.

Play ends when:
--One player has placed all 8 of his Cards on the board (instantly declared the winner).
--The amount of Cards on the Board equal 5 times the amount of players. Points are totaled for Card Values on the Board and Persuasion Chips. Shipwreck Counter values are subtracted. Total points win.

Labels: ,

Thursday, November 02, 2006

December 2005 - More...Brains

Since BGDF has moved over to a new server, they will eventually lose all of their old posting. So now I have to keep a record of my showdown entries somewhere else.

More....BRAINS!
(Ghastly Graveyard, Deluxe Starter Set w/ Grabby Hands)

Using the 25 tiles provided, randomly build the Graveyard Map in a 5 by 5 square. Each tile has a Safety number on it (Safety number range from 15-40). Players are divided into either Zombies or PreZombies (Humans) through any known random means. Roughly 25% of the players should start as Zombies. PreZombies get character markers placed on the upper-left tile. Any PreZombie that makes it to the lower-right exits the Graveyard and wins. (For tougher PreZombie challenges, the Zombie ratio can be increased, or the Graveyard shape can be altered; for an easier challenge, the game can be started with less Zombies). Each Zombie gets a Grabby Hand.


PreZombies get dealt 8 Escape cards (Cards show numbers from -3 to 10) to start. Game begins!

PREZOMBIES MOVE: PreZombies move the markers one space vertically or horizontally on the Graveyard Map. PreZombies may discuss where they wish to move before moving. PreZombies that are on the same tile may freely exchange Escape cards.

After moving markers, PreZombies play any amount of face-down Escape cards from their hands in front of them. The sum total of the cards will be compared to the Safety value of the tile during the Reveal phase.

ZOMBIES GRAB!: All PreZombie players close their eyes. All Zombies "countdown" by chanting these words "Hungry...need...more...brains...NOW!" On the word "now!" all Zombies select a PreZombie by grabbing at them with their Grabby Hand. Selections by the Zombies should NOT be discussed beforehand. PreZombies can open their eyes now. When not using the Deluxe set, Zombies merely point instead of grabbing.

PREZOMBIES REVEAL: PreZombies flip over and reveal the total value of their Escape cards. Any PreZombie who exactly matches the Safety number on his tile with his value of Escape cards is safe from all Zombie grabs. Otherwise, a PreZombie is turned into a Zombie based on having the least amount of Escape points amongst the other PreZombies on his current tile. EXAMPLE: A PreZombie is turned into a Zombie if one Zombie grabs at him, and he has the lowest Escape total amongst the PreZombies on his tile. If 2 Zombies grab, then he is turned into a Zombie if he has the lowest, or 2nd lowest Escape point total; if 3 Zombies grab at him, then he is turned if he is third to last, second to last or last, etc...

If more Zombies grab at him than there are PreZombies on his tile, then the only way he is safe is if his Escape point total equals the Safety number of the tile.

A just-turned Zombie discards all of his cards and takes a Grabby Hand.

PreZombies that are not grabbed at are automatically safe.

Any PreZombies who survives AND matches the Safety number draws two new Escape cards automatically. Some tiles will offer bonus cards just for surviving on the card. Other will give bonus cards for PreZombies with the highest Escape total.

A new round starts. Game ends when all PreZombies have exited the board or when all players have become Zombies.

Hint: In general, PreZombies should keep together as only the "slowest" PreZombies will be typically lost. However, PreZombies are free to go off on their own in the hopes of collecting more cards, or for better matching Safety numbers. Other strategies include: trying to get Zombies to grab at you when you have matched the Safety number, and bluffing Zombies away from you when you have played ridiculously low-valued Escape cards. Conversely, Zombies should try and get a read on "tells" a PreZombie may have when playing low Escape cards, or when matching a Safety number.

EXPANSIONS:
Various new locations for maps/tiles: Montgomery Bringembeck Hospital, Restless Lincoln High School, Tombstone Central Mall, AirStrike 3 Military Base, etc.

New Advanced Escape card sets which can include weapons (ex: Baseball Bat, no escape points but reduces the amount of Zombies grabbing at you by 1) and ancient voodoo spells (ex: Elixer of Life: Select one Zombie grabbing you to return to PreZombie status. His marker starts on your current tile) to fight the Zombies.

For the real adventurous, Grabby Hand Dipping Slime! Zombies get to dip their Grabby Hand into a bowl of officially-sanctioned More...Brains! water-soluable slime before grabbing for their helpless victims.

And of course, more Grabby Hands!!

Labels: ,

Thursday, August 17, 2006

January 2006 - Triple Lyndig

Since BGDF has moved over to a new server, they will eventually lose all of their old posting. So now I have to keep a record of my showdown entries somewhere else.

Triple Lyndig
(Figure Skating in the Detroit Professional Skating League)

The “board” is an ice skating rink 2 foot by 3 foot, divided into 6 performance zones. Each zone has a BullsEye target of three colored rings, known as the Performance Rating Area (PRA). On the perimeter in each zone are holes to place completion flags.

Teams of 2 players are randomly decided, as is the order of the teams to perform.

The Performance:
Each member of the Performing Team is given a large wooden puck (Skaters). One member gets a deck of cards whose cardback says "Skater," the other gets a deck called "Partner." Players who are watching the performance each get a medium obstacle puck (Octopus) and a small obstacle puck (Banana). The performing team gets 20 completion flags.

The Performing Team starts with their Skaters in any zone they wish. A turn consists of:
1)The team draw cards from their decks to maintain a hand of 8 cards.

2)They select five cards face down in front of them from their hand, keeping three cards in reserve. They may discuss which cards they want to play.

3)Watching players may "throw an obstacle on the ice" by placing one of their obstacles on the outer edge of the rink and flick it once in to the rink.

4)Each Performing Player flicks their Skaters on the rink. Place a completion flag in a hole in the zone that each Skater slide into. Players may decide to flick their Skaters again, at the cost of placing more completion flags. If a Skater falls off the rink, place 3 flags in that zone to bring the Skater back on where it left the rink. Obstacles may be hit with no penalty (they just get in the way). Skaters can bounce their pucks off of previously placed flags.

When all completions flags are placed on the rink, the players cannot flick their discs anymore, and they have one last round of playing cards.

Both Skaters MUST be in the same zone to play cards and be in a different zone than the zone in which they started the turn.

5) Performing players takes turns playing one of their five selected cards, starting with the player playing the Skater deck. These cards feature traditional skating moves (“Backwards Gracefully”, “Backflip”,”Double Axle”) which award points based on how close the Skater is to the center bullseye of the PRA. The Partner deck player must play a matching traditional skating move (with points awarded as described), or a special Partner move (such as “Lift and Hold” or “Throw Her Into The Air”) which multiplies the point total on the previously played card from the Skater deck. Players may play any amount of cards they wish, or none at all before declaring this turn over. Keep the running total of points on a pad of paper. Players not touching any ring color cannot play any cards.

Some cards will require the Skater being in certain zones, the Skater touching certain colored rings on the PRA, or other restrictions based on scoring potential.

Examples:
“Forward Gracefully” has no requirement, but scores a single point when touching the “average” ring of the PRA, 2 points when touching the “Excellent” and 4 points in the “Perfect” circle.

The Partner card, “Lift and Hold” has a multiplier of 2X touching an “Excellent” ring and 3X when touching the "Perfect” circle in the PRA, and cannot be played otherwise.

The very high scoring “Triple Lyndig” requires being in any ring of the PRA in a corner zone with a single flick from a corner zone on the other side of the rink.

6)All obstacles are removed from the rink. Both Players discard the five cards they selected. They may also discard any amount of their three reserved cards. If the Skaters have at least 2 completion flags left, they start a new turn back at step 1.

When a team has finished performing, look to see which zone has the least amount of completion flags. The judges like Skaters who use the whole rink. Bonus points are awarded based on the number of flags in the least visited zone, the more the better.

After all teams have had a chance to perform, the team with the highest score wins. Multiple rounds may be played with more or less completion flags (short program and long program) with order of performance reversed. The total for both rounds is added to determine the winner.

By removing the Partner deck, and lowering the completion flag amount, players can also play as single skaters.

Labels: , ,

Wednesday, August 16, 2006

February 2006 - Love Me Blender

Since BGDF has moved over to a new server, they will eventually lose all of their old posting. So now I have to keep a record of my showdown entries somewhere else. Well, at least the ones I find to be viable...

Love Me Blender!
(manufactured by Presley Kitchenware Inc.)

Two players create love potions to move Pat on the Infatuation Line.

Components:
-The Love Me Blender[1] and Blender Base[2].
-Marbles, in four "Ingredient" colors, and additionally, black and clear.
-Marble bag.
-8 small bowls.
-Board showing the Infatuation Line[3] and many potion recipes[4].
-Pat, a pawn.
-Markers to cover up used recipes.

Setup:
-Place Pat on the Zero space on the Infatuation Line.
-Black and colored marbles go in the bag, clear marbles in a bowl off to the side.
-Each player gets a bowl for their stock of Ingredients. Four "Storehouse" bowls are placed in the center of the table. The last bowl is used for black marbles.
-Decide who goes first.

Gameplay:
A player performs one of the following two choices:

-Collect Ingredients:
The player takes all the marbles from one Storehouse and places them into his personal stock.

-or-

-Attempt A Potion:

The player takes any amount of marbles from his stock and places them into the Blender along with an equal amount of clear marbles[5]. The Blender is then shaken by the player; the opposing player may also shake it if he feels that it is not mixed enough. Place Blender on the Blender Base and Press "MIX", which releases all marbles into the reservoirs.
All clear marbles are returned to their bowl.
Remaining marbles in the BAD reservoir are returned to the bag.
Remaining marbles in the RETURN FROM BLENDER reservoir are divided up and placed into the four Storehouse bowls in any way the acting player decides.
The player selects ONE unmarked potion from the board by matching the ingredient list of the potion to the marbles in the GOOD reservoir[6]. The player puts a marker on this potion[7] and moves Pat the number of spaces indicated on the potion, or to the next colored space that is indicated by the potion[8] towards himself.
If there are no potions available that match the GOOD marbles, the player fails to make a potion and cannot move Pat.
All GOOD marbles are returned to the bag.

After doing either A or B above, the player then pulls 5 random marbles from the bag. Black marbles go in the 5th bowl. The player then distributes the colored marbles anyway he wishes in the 4 Storehouses.

The other player takes his turn.

A round ends immediately when A)Pat hits a 10 point space for one player, or B) 6 black marbles are in the 5th bowl.
Pat scores points for the player based on which side he is on. The points awarded are listed on the space Pat is on. Return Pat to the zero space. Return all black marbles and marbles from players personal stocks to the bag. A new round starts[9].

Points are doubled for the 2nd round, tripled for the third. The game is over after 3 rounds, or if all potions have been covered. Best total score wins.


[1] The Blender is a plastic toy that looks like a typical Blender which holds many marbles, except that the pitcher is opaque. There is a "MIX" button on the front. Inside, there are three holes which marbles can escape from down into the Blender Base when it is placed on the Base. These holes are normally blocked (marbles cannot escape) by a spring-locked sliding trap door mechanism. Pressing the "MIX" button slides the trap open, releasing all of the marbles through the three holes.

[2] The Blender sits on the Blender Base, which has three reservoirs for catching marbles (these are labeled "GOOD", "BAD", "RETURN FROM BLENDER"). Inside the Blender, funnel shapes lead into the holes which roughly distributes the marbles so that 1/2 go to the "GOOD" reservoir, 1/4 go to "BAD", and 1/4 go to "RETURN FROM BLENDER".

[3] The Infatuation Line looks like this:


[4] There are two types of Potions: "move X Spaces" and "Move to Color."
Examples:
"Empathy Elixier. 2 red/1 yellow. move 1 space."
"Howl at the Moon. 1 red/1 yellow/1 green/2 blue. move 2 spaces."
"Sweet Clementyne. 4 blue/3 red/1 yellow. move to Purple."
"Chocolate High. 4 green/2 yellow/2 blue. move to Yellow."

[5] Clear marbles are added to prevent suspicious shaking in the hopes of getting more marbles to fall into the "GOOD" reservoir.

[6] Odds are, many GOOD marbles will be unused when matching to a potion.

[7] Any potion is only used once during the entire game. Pat becomes immune quickly.

[8] There is no 10 space colored potion; a potion that "moves X spaces" would be required to move there.

[9] Markers from potions are not removed when a new round starts. More complex potions will be used during later rounds. Likewise, storehouses are not "reset."

Labels: , ,

April 2006 - Tune it Up!

Since BGDF has moved over to a new server, they will eventually lose all of their old posting. So now I have to keep a record of my showdown entries somewhere else. Well, at least the ones I find to be viable...

Tune it Up!


Who will own the most prestigious tuner shop in town? And have the hottest collection of illegal street racers?

THINGS:
Money.
Deck of Parts. This deck has cards showing various Street Racing Tuner Parts. Each Part has a value of Prestige Points (PP).and has 5 duplicate cards in the deck.
Deck of Costs. These cards show a large money value the Owners must pay after submitting a winning bid, and a small money value to buy a Prestige Cube. Cost cards also have a reduced Cost rate list, under a heading called "End of Year Sale!" There are also 4 Change of Season cards in this deck.
Bag of Colored Prestige Cubes in Black, Orange, Purple.
Plastic Colored Cars in Black, Orange, Purple.

SETUP:
Shuffle the Cost deck and Parts deck. Place decks facedown. Place Cars and bag of cubes off to the side.
Every player gets $5000 in cash, and draws 5 Parts.
Randomly decide the first Customer.

WINNING:
A player’s score is determined by:
1) SEASONAL POINTS: Players score PP from Unique Parts held in an Owner’s “shop” in hand during a Change of Season. Shops who have Unique Parts are more Prestigious than those who carry Parts that everyone else has.

And at the end of the game:
2) OWNER POINTS: Players score PP from each Car he has worked on as an Owner. Owners open the Car hoods to reveal the Prestige Cubes. Owners score 10 PP for each Car plus 4 PP for each Cube that matches the Car’s color. This represents the reputation on the street that a player’s shop has for rigging cool cars.

3) CUSTOMER POINTS: Player score PP from the Parts cards he has collected as a Customer. These indicate how cool his street racers are. Also, Cars without Prestige Cubes in them subtract 5 PP for having a non-tuned stock car.

At the end of the game, each player announces that he will double the value of either his Customer Points or Owner Points. Whoever has the most total points of Seasonal, Customer, and Owner Points wins the game.

GAMEPLAY:
The Customer reveals one of his Parts and asks all the other players, the Shop Owners, how much they will charge to ”install the Part.” All Owners look at the top card of the Cost deck (but not the Customer).

If the Cost Card shows a “Change of Season,” gameplay stops. All players reveal their current Parts held in hand (in their “shop”). Players who have Unique Parts (Parts that no other player has) score the PP shown on the Parts cards. If the fourth Season card is drawn, the game is over. Otherwise, all Parts cards are discarded, and Players draw a new set of Parts cards, equal to the amount of Parts they had plus two. All players get an additional $1000 in cash, and the Customer now starts the phase again.

If it is a Cost card, the large value is Owner must pay (for parts, labor,etc) if he wins the negotiation with the Customer and gets the job. The Owners state their initial bid with the Customer, and can freely change their bids as they all negotiate the price with the Customer. The Owners may offer bids less than or greater than the Cost card value. The Owners may also add Part cards from their own hand to try and sweeten the deal. (“Hey, I’ve got a Mega-Spoiler in the shop, I’ll add it for an additional $100…”). The Customer will have to determine which, if any, bid to take, and agree to a deal from an Owner.

If a deal is reached, the Customer collects all Part cards of the deal and places them to the side, and pays the winning Shop Owner from his cash. The Owner reveals the Cost card, pays the Cost shown to the bank. The Owner then selects any colored Car. The Owner may then “go the extra mile” on the car by spending the small money amount on the Cost Card to draw Prestige Cubes. He can make multiple payments for multiple Cubes. Regardless of money spent for Cubes, the Owner gets one free Cube. The Owner blindly draws the amount of Cubes owed, and hides them in the hood of the newly “worked on” car.

If no deal is reached, the Customer collects a Car without placing any cubes in it and discards his Part.

The player to the left becomes the new Customer.

After the third Change of Season card has been drawn, the Cost values used are the ones listed under "End of Year Sale!"

Labels: , ,

Monday, August 14, 2006

June 2006 -Hoe! Hoe! Hoe! Migrant Green Giant

Since BGDF has moved over to a new server, they will eventually lose all of their old posting. So now I have to keep a record of my showdown entries somewhere else. Well, at least the ones I find to be viable...

Hoe! Hoe! Hoe! Migrant Green Giant!

Each Round has four different phases:

WINTER:
With FarmBucks (the local currency), players may buy new PARCELS OF LAND and/or pay to SWITCH TO A DIFFERENT PLANTING CROP from the previous Round. Each Round, the price to do either increases.

There are four different Crops (Corn, Soybeans, Cotton, and Rice). There is no charge to plant the same Crop as last Round. Players only have 1 Planting Crop per Round.

Parcels are land areas on the board; some have a RIVER running through them, others do not. Each Parcel can potentially produce 2 different Crops (however, only one may be produced per Round). Each Parcel shows a CROP TRACK of the amount of a particular Crop that will be produced on the parcel, if that Planting Crop is selected. Parcels also show a VP amount (the larger the VP, the smaller the values on the Crop Track).

When a new parcel is purchased, a player places a BARN of his color on the center space of the Crop Track. The cost to buy a new Parcel next to a previously owned Parcel is reduced slightly.

SPRING:
Players draw RAIN cards from the RAIN DECK equal to the amount of Parcels they own. Players play Rain cards from their hands at will (or may keep them for further Rounds) until no one wishes to play another Rain card. Rain cards show values from -3 to +3. Playing Rain lets a player move the CLOUD TOKEN (as indicated by the Rain card played) on the RAIN TRACK. The Rain Track runs from 0 to 20, indicating how much rain “the county” receives this year. When everyone stops playing Rain cards, if the Cloud is on space 5 or less, there is a DROUGHT, and only Parcels with Rivers will produce Crops this year. If the Cloud is on space 15 or above, there is a FLOOD, and only Parcels without Rivers will produce Crops this year.

SUMMER:
Roll (number of players+1)d6 to determine how many MIGRANT GREEN GIANTS come to town this year to work the fields. Players secretly write down how many Giants they want to hire. Players may discuss before deciding on their hire amount. Players then reveal their amounts. An additional 1d6 is rolled and added to the dice total. If the total amount of Giants all players want to hire is less than (or equal to) the total amount of the dice roll, then all players take their amount desired of GIANT FIGURES. If the total amount of desired hires is more than then dice roll, then the player (or players tied) with the most desired hires gets none (Giants abhor being forced to work for demanding land owners!). Players may discuss, barter, or trade money, Parcels, Giants, future Crops, Rain Cards, etc. at any point.

Players place 1 Giant on each Parcel they wish to be harvested. Parcels affected by Flood/Drought will not produce Crops regardless if Giants are working those Parcels.

FALL:
Players tally up their harvest. On each Parcel a player owns that has a Giant and is not affected by Flood/Drought, check the Crop Track, and if a Crop matches the player’s Planted Crop, then the players earns the amount shown in FarmBucks. Move the player’s barn one space on the track TOWARDS large Crop icon that matches the selected Crop.

Parcels which do not have the player’s selected Crop on their Crop Track do not produce anything in this Round. However, the Barn on such Parcels is moved, if need be, one space towards the center space on the Parcel’s Crop Track. Do not move the Barn on flooded or Drought-ed Parcels.

Remove all Giants from the board.

Winning the game:
After 6 cycles through the Rain deck, the game is over. The player who has the most total VP shown on they Parcels they own wins.

EXAMPLE OF A SINGLE PARCEL:


Red (with his barn) owns the Parcel above.
To produce 1 FarmBuck from Corn, Red must have Corn as his selected Crop, place a Giant on this Parcel to harvest it, and not have the Rain Track show Flood, due to the river.
Then the barn move one space over to the left. This land has been “farmed out” of Corn for now (but will produce lots of soybeans!).

To produce 3 FarmBucks from Soybeans, Red must have Soybeans as his selected Crop, place a Giant on this Parcel to harvest it, and not have the Rain Track show Flood, due to the river.
Then the barn move one space over to the right.

Labels: , ,

July 2006-THE GREAT LAKES FISH OUT!

Since BGDF has moved over to a new server, they will eventually lose all of their old posting. So now I have to keep a record of my showdown entries somewhere else. Well, at least the ones I find to be viable...

THE GREAT LAKES FISH OUT!

Wait for the right time, and you could be haulin’ in the Bass by the truckloads. But wait too long, and someone else is going to get your prime fishing spot. And look out for the Minnows; unless you get a full family of them, the judges don’t look too kindly on people catching those little guys.

For Four Players.

FISH OUT! is played in a series of games, until one player scores 50 points, who is declared King Fisher!

The center of the table is the LAKE.

The cards represent FISH.

Players “STOCK THE LAKE” with Fish by placing cards into the center of table. All Fish stocked to the Lake are played face up in any reasonable way so that card ranks and suits are visible.

Players “FISH OUT” the Lake by collecting all of the cards from the Lake which all match a chosen suit.

A game is played with a standard 52-card deck which is shuffled and dealt face-down to all players. After looking at their cards, players select three cards and pass them face down to a different player each round, as is common in Spades.

A game is played in a series of Tricks. The player with the 2 of Clubs starts the first round by playing the 2 of Clubs. A trick is defined loosely here, as some tricks will have no cards taken by players, and in others, multiple players will take up cards. Cards remain on the table until a player Fishes Out a suit.

During a trick, each player in turn plays a card face-up from their hand. Players do not have to follow suit. After all players have played their cards, players who have played the highest ranking card of each suit keep their card; all players otherwise must stock the Lake.
Cards are ranked as Ace low/King High.

EXAMPLE:
Joe plays 10 of Hearts.
Wanda plays 3 of Hearts.
Anna plays 6 of Spades.
Marty plays Jack of Diamonds.


Joe has the highest Heart, beating Wanda; Joe keeps his heart while Wanda places her card in the Lake. Anna and Marty both have the highest rank in their suits because their suits are uncontested by other players and keep their cards.

For those players who still hold their card, they may decide to either stock the Lake with it, or Fish Out all of the cards from the Lake that have the same suit of their card. When Fishing Out, the player collects all of the cards of their matching suit (including the card they hold) and places those cards face up in front of them in a stack. Each suit should be in its own stack.

However, there are three restrictions to Fishing Out:
1) If the Lake has no cards with the suit of the card played, the player cannot Fish Out and MUST stock the Lake with his card.

2) A player can only Fish Out a maximum of 4 times per game, once for each suit (check the stacks of Fished Out cards in front of them).

EXAMPLE:
Joe Fished Out spades on a previous trick in this game, all subsequent spades played by Joe in this game must be used to stock the Lake.


3) On the last trick of a game, the player does not have the option of stocking the Lake or Fishing Out. The player MUST Fish Out if the player meets the above requirements. Otherwise, he stocks the Lake.

The player who Fished Out the most cards begins the next trick. If no one Fished Out, then the player who started the last trick leads again. If there is a tie for the most cards Fished Out, then the player who tied for the most who is closest clockwise to the player who began the last trick leads.

After all cards have been played, players are scored based on the Fish in their stacks. There may be unclaimed Fish in the Lake.

SCORING (Pre-playtesting, first-guess):
Each Ace scores -9, unless a player has all four Aces, then the four Aces score a total of +18 instead.

Each Jack, Queen, and King scores +3 points.

All other cards score +1 point.

Labels: , ,